Hi, this is CoinFirstStep. If you live in India and want to buy USDT on Binance with INR, there are two routes: Binance P2P, or an Indian exchange that you send the USDT from. This guide shows the P2P screens one at a time, then explains the exchange route.
The short answer: tap Deposit → P2P Trading, choose Buy, USDT and INR, then either let Express match you with an ad or pick a seller yourself on the P2P tab. Pay the seller by UPI from a bank account in your own name, tap Transferred, Notify Seller, and the USDT lands in your Funding Account once the seller releases it. Already use an Indian exchange? Buy USDT there and send it to your Binance deposit address on the same network (section 6).
20% commission rebate
Referral link: you get a 20% commission rebate on your trading fees (disclosure).
At a glance
| What you need | A Binance account with KYC finished and 2FA turned on, and a UPI app linked to a bank account in your own name |
|---|---|
| Where | Binance: Deposit at the top → P2P Trading (or Trade → P2P) |
| Two ways on P2P | Express: Binance shows the best ad for your amount / P2P: you pick the seller |
| Other route | Buy USDT on an Indian exchange and send it to Binance (section 6) |
| Time to pay | Shown as Payment time limit before you order (15 min on my screen) |
| Where the USDT goes | P2P: your Funding Account |
1. What Binance P2P is
P2P means peer-to-peer. You don't buy USDT from Binance itself. You buy it from another Binance user (the seller), and you pay that person directly in rupees, for example by UPI. Binance's part is to hold the seller's USDT for the order and release it to you once the seller confirms your payment.
That is why P2P works differently from the rest of Binance:
The seller sets the price. Every ad has its own rate. On my screen, one ad sold at ₹103.99 per USDT and another at ₹104.97, at the same moment.
Each ad has limits. Every ad shows the smallest and largest amount you can buy from it. The range differs a lot: the ad in section 4 took only ₹200 to ₹400, while the Express box on my screen accepted ₹200 to ₹5,000,000. Pick an ad whose range fits the amount you want to spend.
You pay the rupees outside Binance. You send the INR from your own UPI or bank app, so Binance only knows you have paid when you tap a button to tell it.
Before you start, finish identity verification (KYC steps) and turn on 2FA (how to set up 2FA). Binance's own P2P guide lists both as requirements.
Pay only from an account in your own name
Binance's P2P User Transaction Policy says the name on your payment account must match the name on your verified Binance account. Paying from a friend's or family member's UPI breaks that rule. If the order ends in a dispute, the policy says the buyer can be left to bear the loss.
Crypto prices are volatile. This is a how-to guide, not investment advice.
2. How to open Binance P2P
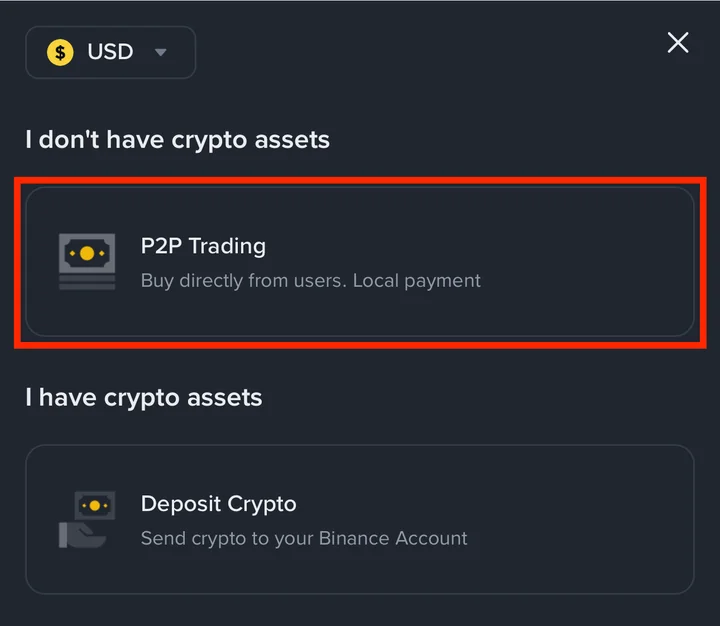
Tap Deposit at the top of the page. Under I don't have crypto assets, tap P2P Trading.
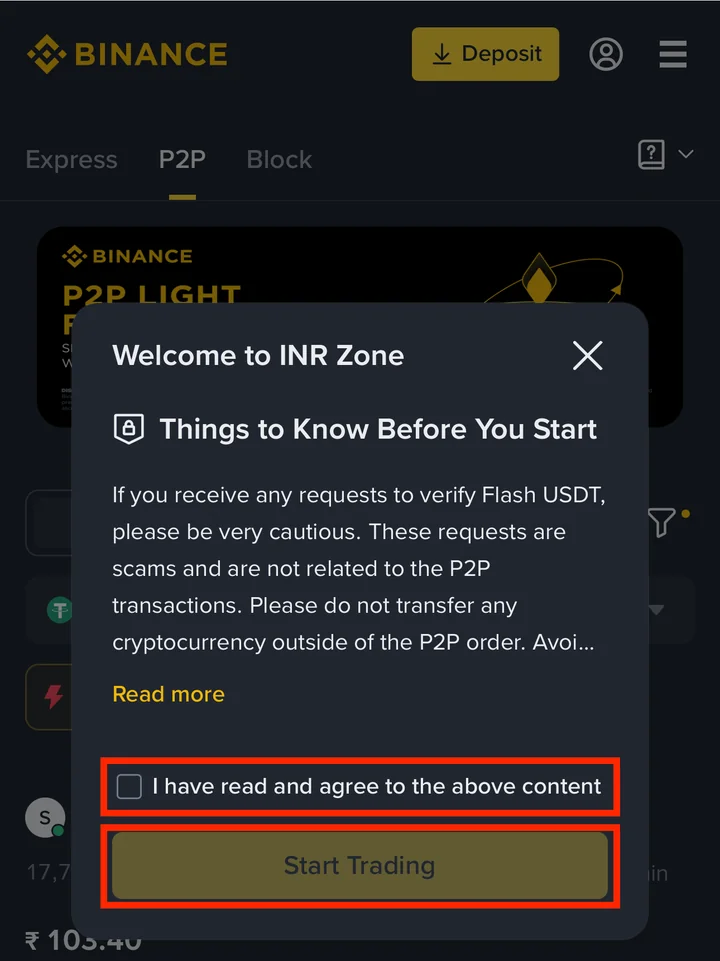
A Welcome to INR Zone notice appears. Read it: it warns that requests to "verify Flash USDT" are scams, and that you should never send crypto outside a P2P order. Paying the seller in rupees for your own order is the normal step, not this. Tick I have read and agree to the above content, then tap Start Trading.
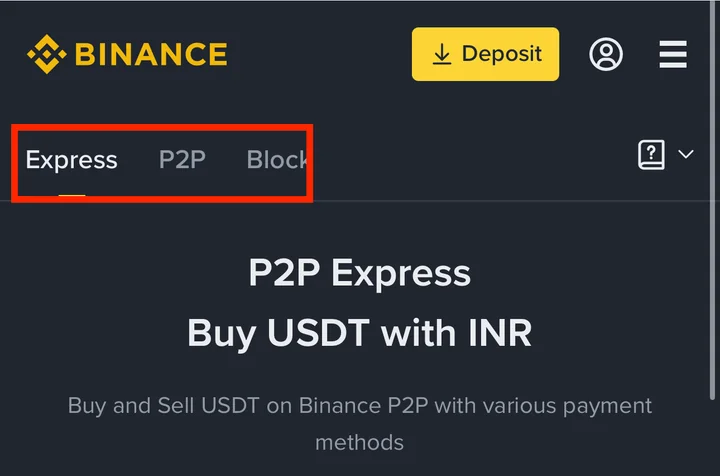
Three tabs appear at the top: Express, P2P and Block. The next section starts with Express. This guide doesn't use Block.
3. How to buy USDT with INR using P2P Express
Express asks for the amount and the payment method, then shows you the best ad it found. You still pay a seller, but you don't have to compare a long list.
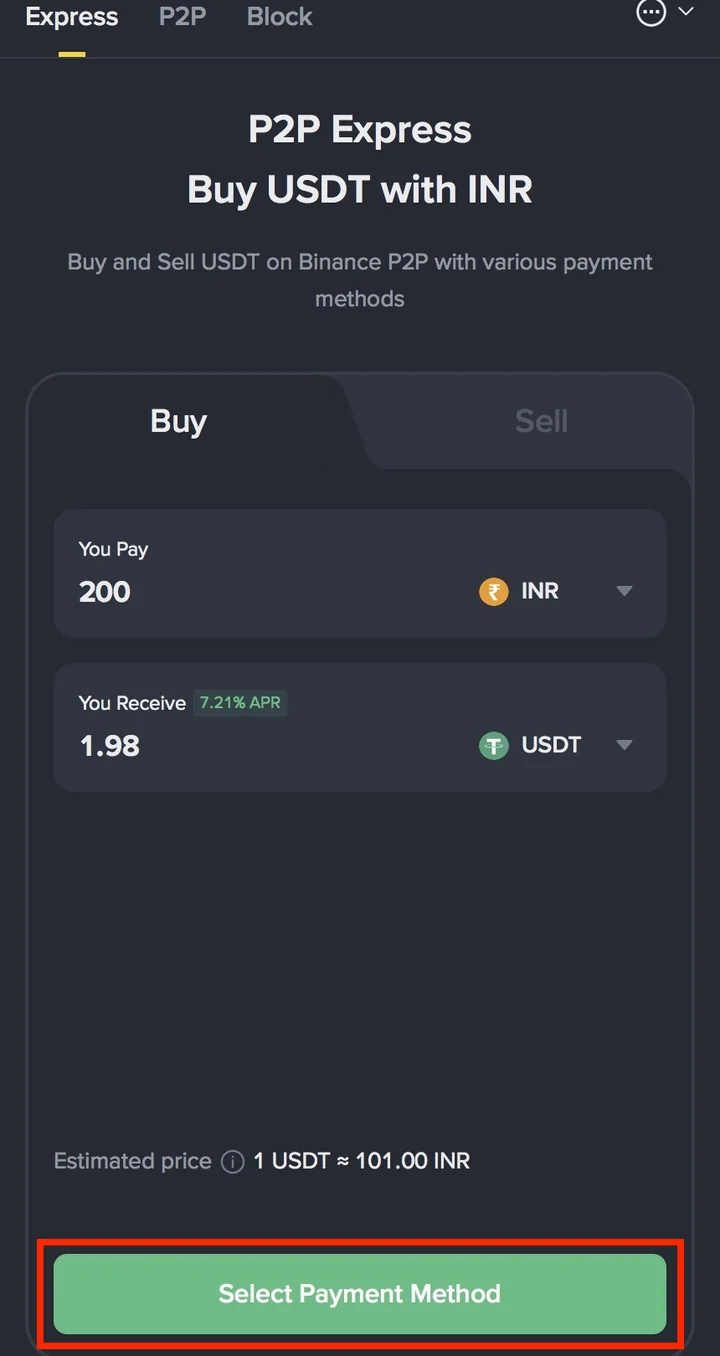
On the Express tab, check that Buy is selected. Type the rupees you want to spend in You Pay. You Receive shows roughly how much USDT that buys. Tap Select Payment Method.
The Express box on my screen accepted ₹200.00 to ₹5,000,000.00.
Choose how you will pay. Each method shows its own rate: on my screen, UPI was 1 USDT = 103.99 INR, Digital eRupee 106.99 INR and Lightning UPI 109.00 INR. Pick the method you will actually use, then tap Select Ad.
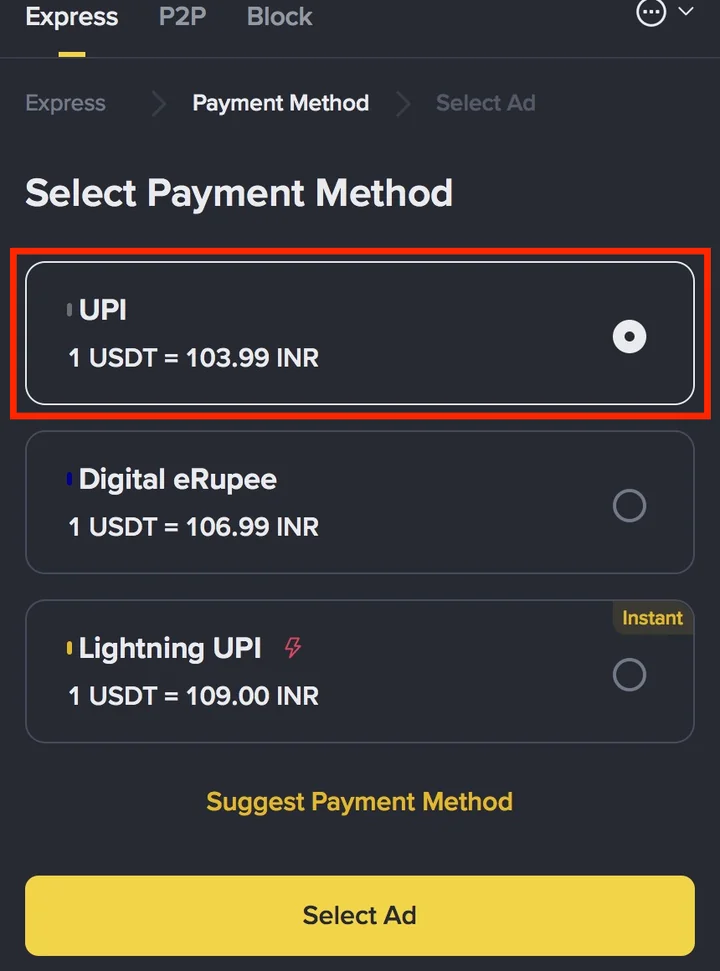
The Select Preferred Ad screen shows the ad Express picked, marked Best offer, with a Preview Order box under it. Check three things:
1. Payment time limit: how long you have to pay after placing the order
2. You Pay: the rupees you will send
3. You Receive: the USDT you will get. This uses the ad's own price, so it can be lower than the estimate in STEP 1 of section 3.
There is also an Auto-subscribe to Earn switch, which puts the USDT into Binance Earn. If you just want the USDT in your account, leave it off.
Find more options shows other ads, and the two tabs at the top switch between Recommended Ad and Verification-free ads.
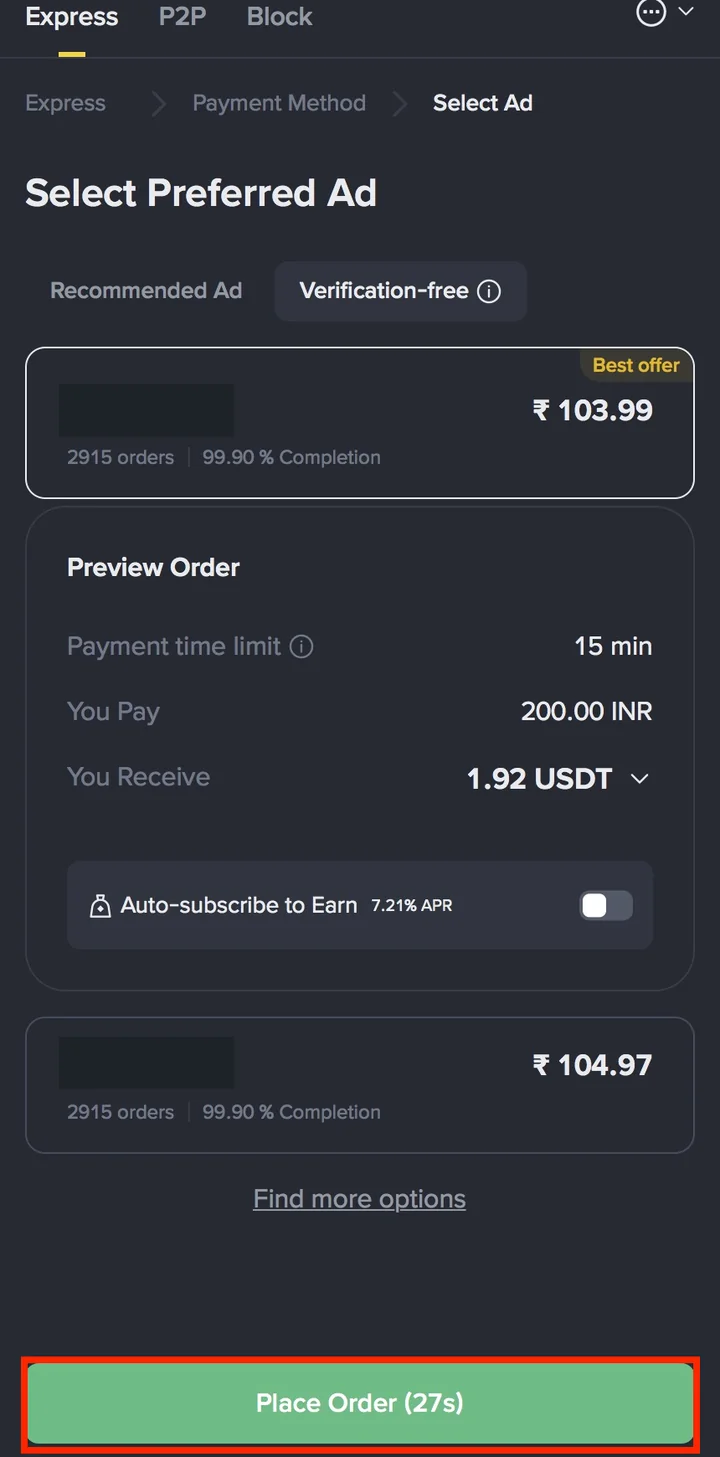
Tap Place Order. The button shows a countdown.
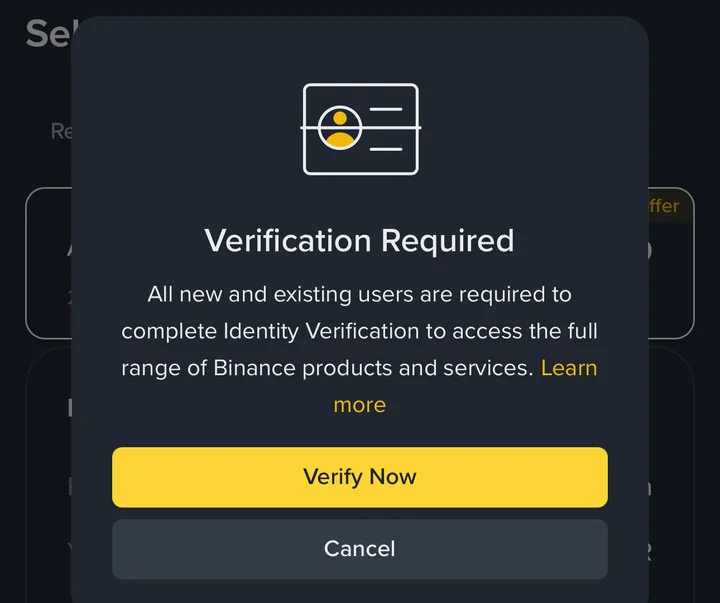
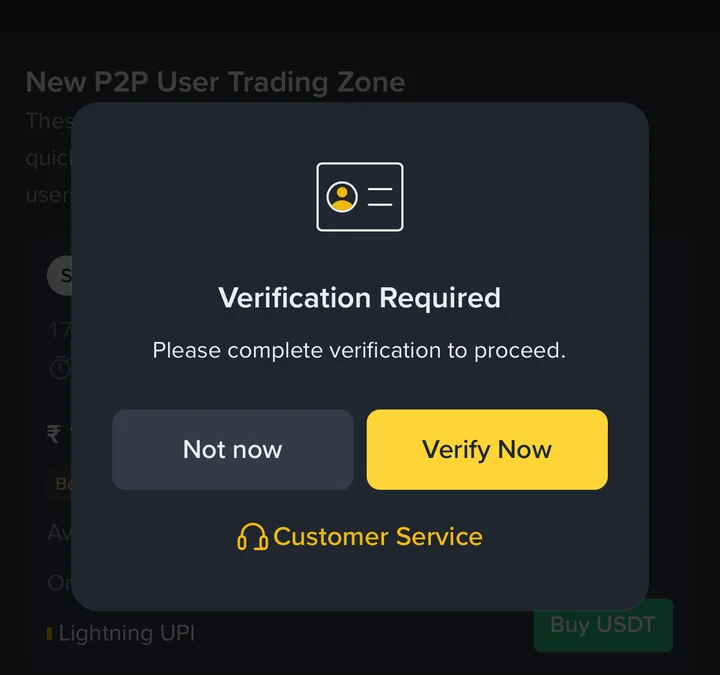
Without KYC, Place Order shows Verification Required, even with the Verification-free tab open, so finish KYC first. With a verified account, the order opens and you go on to section 5.
4. How to choose a seller yourself on the P2P tab
If you want to compare sellers, use the P2P tab instead of Express.
Choose Buy, then USDT and INR. Each ad shows:
1. The seller's orders, completion rate and positive feedback
2. The price per USDT
3. Available: how much USDT the seller has
4. Order Limit: the smallest and largest order (200.00 INR – 400.00 INR)
5. The payment method (Lightning UPI)
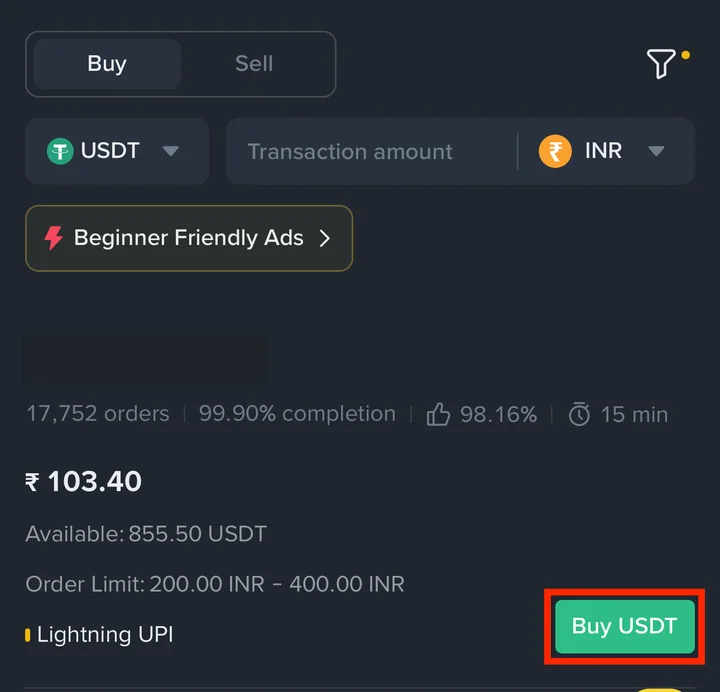
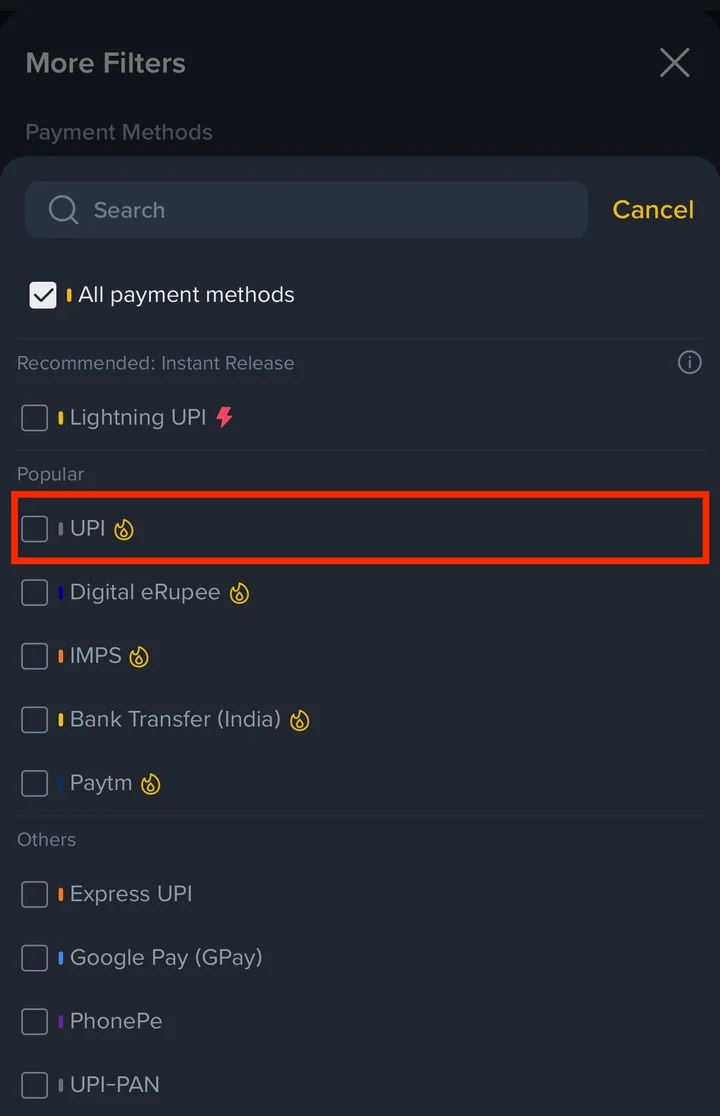
Tap the funnel icon to open More Filters. Tap Payment Methods and tick the method you will use, such as UPI or IMPS.
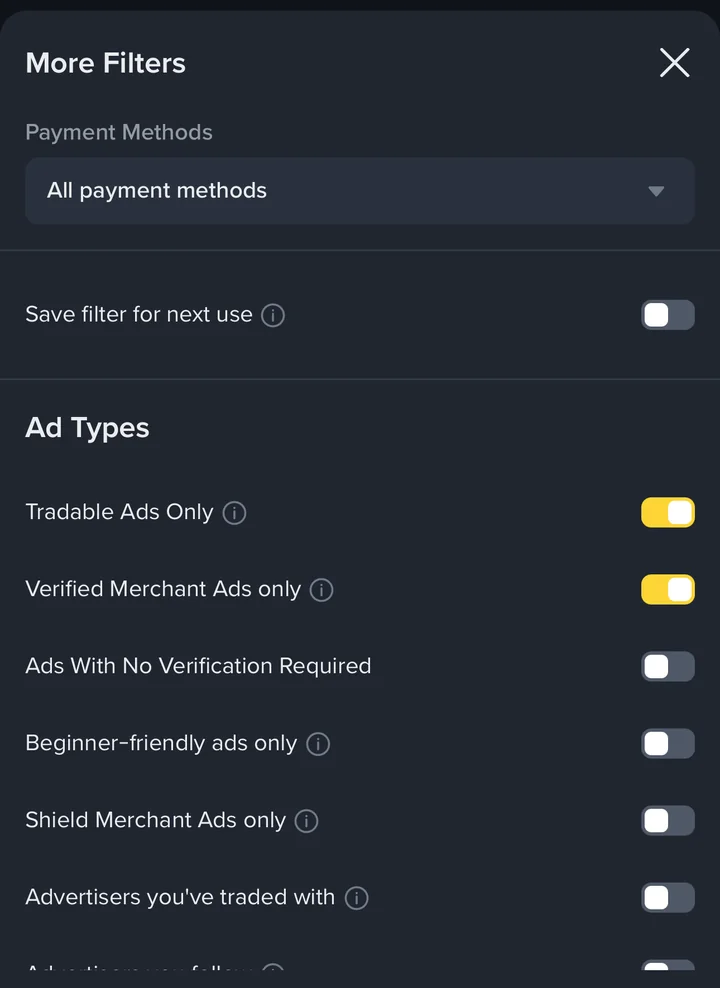
Below that, Ad Types narrows the sellers further. Tradable Ads Only and Verified Merchant Ads only were already on in my filter. For a first order, a seller with many orders and a high completion rate is the simplest check. Tap Apply at the bottom.
Tap Buy USDT on the ad you chose. Without KYC, this tap already shows Verification Required, just like Express. Binance's guide says that with a verified account you then enter the amount and tap Buy USDT to create the order.
5. How to pay with UPI and receive your USDT
The steps below follow Binance's official guide, How to Buy Cryptocurrency on the Binance P2P Website.
Once the order is created, pay the seller using the seller's payment information on the order. Binance's P2P User Transaction Policy says an order that isn't paid within the time limit is cancelled automatically.
Open your UPI app and send the amount shown on the order to those payment details, from an account in your own name. The policy also says to pay only if the seller's account name matches their name on Binance.
Back on Binance, tap Transferred, Notify Seller. The order moves to Releasing. If you need to say something to the seller, use the chat inside the order.
▣ Tap it only after you have paid
Binance's guide says not to tap Transferred, Notify Seller before the money has actually left your account, and not to cancel an order you have already paid unless the seller has refunded you.
The seller checks that your rupees arrived and releases the USDT. It goes into your Funding Account. Tap View my balance to see it.
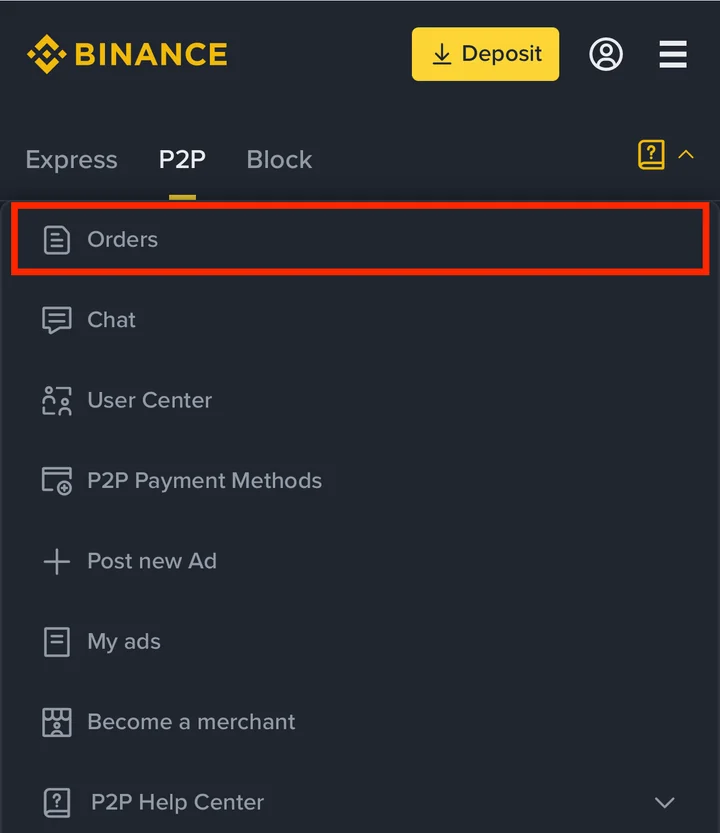
You can find this order again later from the menu at the top right of P2P → Orders.
If the seller doesn't release the USDT
If the USDT doesn't arrive within the release time, tap Appeal on the order page. Binance customer support then looks at the order. Keep your UPI transaction reference ready.
Two limits to know
Binance's guide says you can't have more than two orders open at once. If you cancel three orders in one day, buying on P2P is paused for the rest of that day.
To trade the USDT, move it from your Funding Account to your Spot Account with Transfer, then follow your first spot trade.
6. Another way: buy USDT on an Indian exchange and send it to Binance
India has its own crypto exchanges where you can buy with rupees, such as CoinDCX, CoinSwitch, ZebPay and Mudrex. If yours lets you withdraw USDT to an outside wallet, you can buy USDT there and send it to Binance instead of using P2P. There is no seller to deal with, but you have to get one setting exactly right: the network.
Each Indian exchange names its buttons differently, so follow its own help pages for buying and withdrawing.
Buy USDT on your Indian exchange with INR. Before you buy, check in its help pages that it lets you withdraw USDT to an outside address.
In the Binance app, tap Assets at the bottom right, then Add Funds.
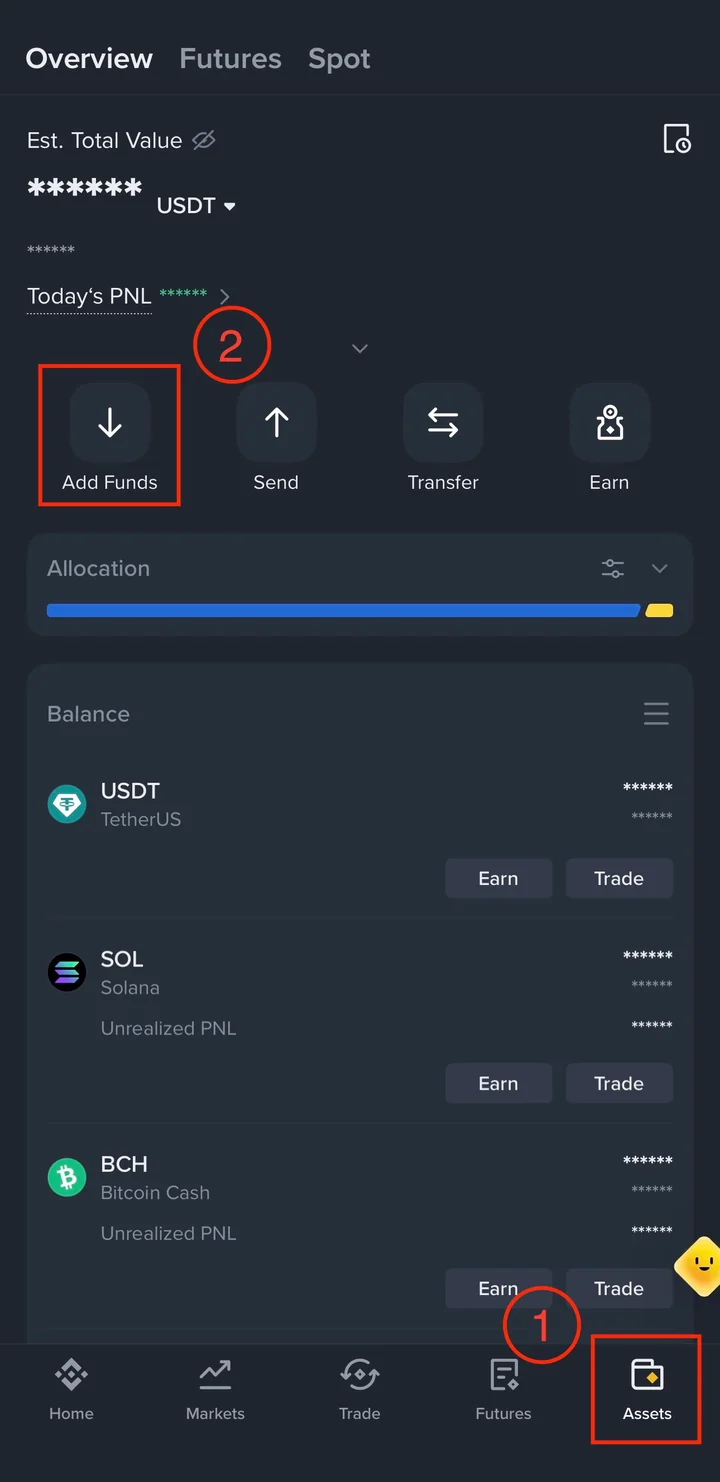
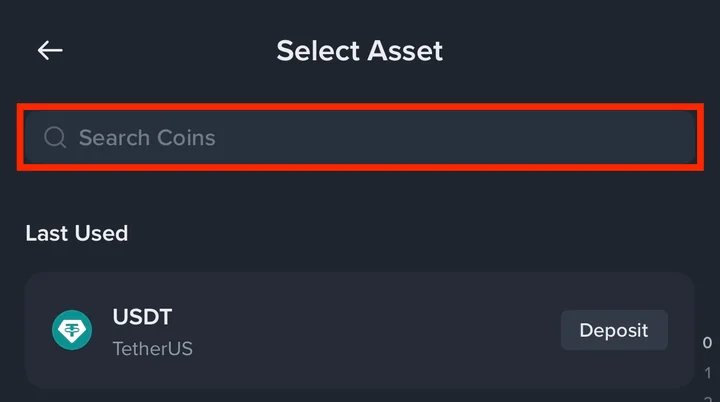
Tap Search Coins at the top and type USDT.
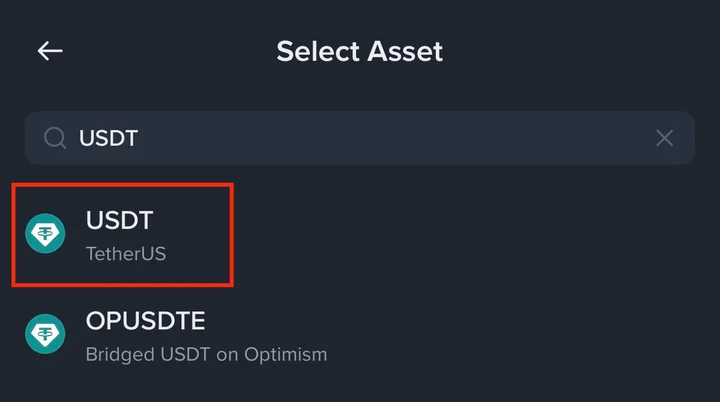
Tap USDT (TetherUS).
Tap Deposit Asset.
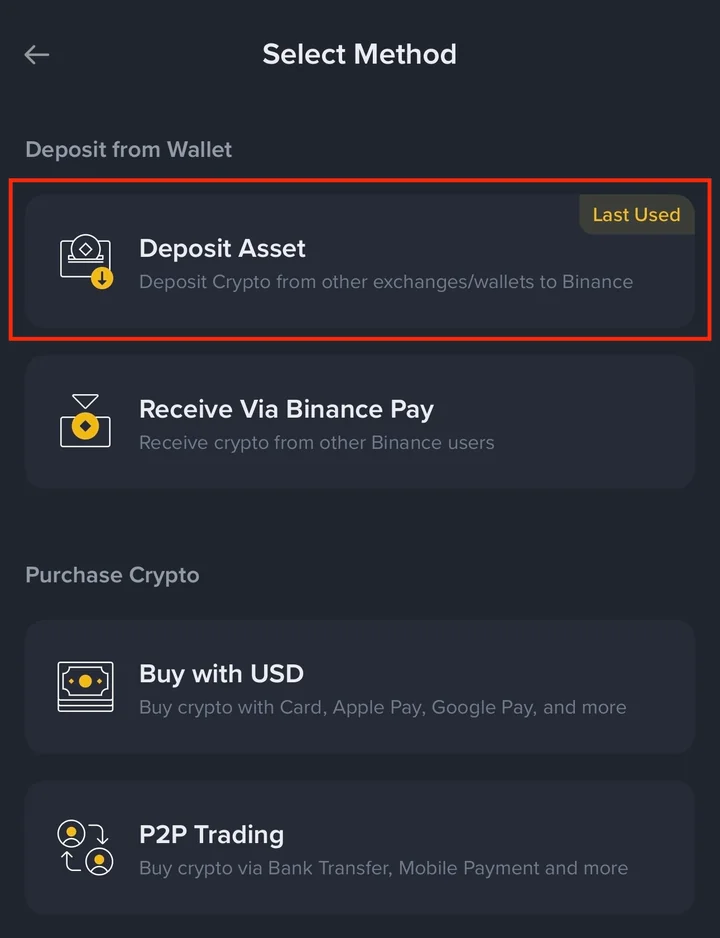
On the website, the same place is Deposit → Deposit Crypto (the window from section 2), then USDT.
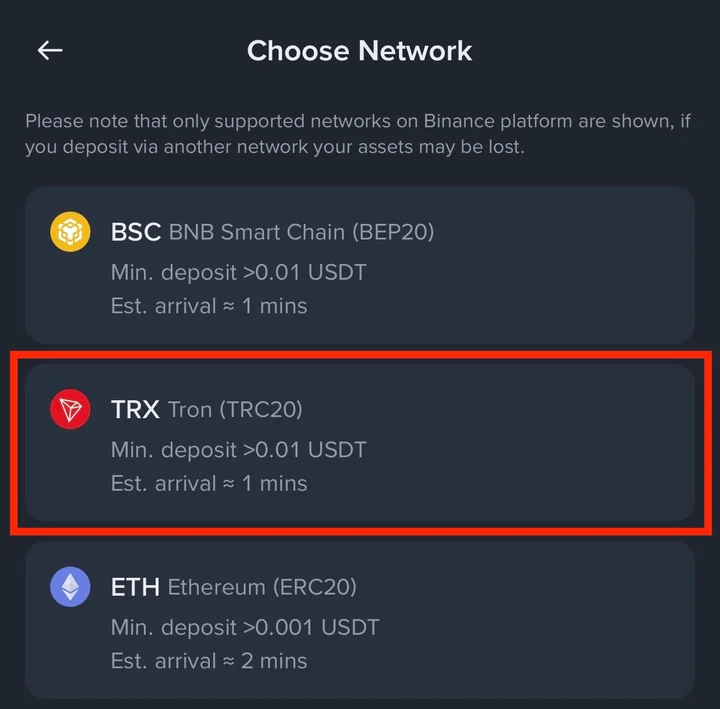
Choose the network. The list shows the networks Binance accepts for USDT, and the note at the top warns that a deposit sent on another network may be lost. Pick a network that your Indian exchange also offers for USDT withdrawals.
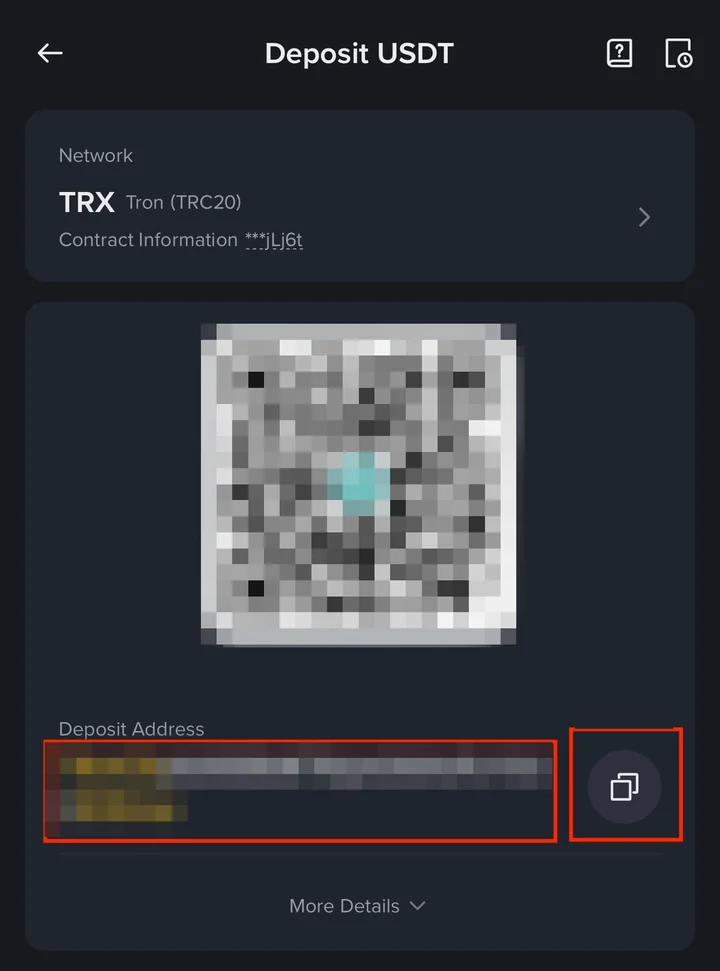
Binance shows your USDT deposit address for that network. Tap the copy button next to the address. Don't type it by hand.
On your Indian exchange, open the USDT withdrawal screen. Paste the address and choose the same network you picked on Binance. If the exchange asks where you are sending it, say it is your own Binance account.
▣ Send a small test amount first
The network on both sides must match. If the exchange doesn't offer the network you picked on Binance, go back and pick one that both sides support. For a first transfer, send a small amount, check it arrives, then send the rest.
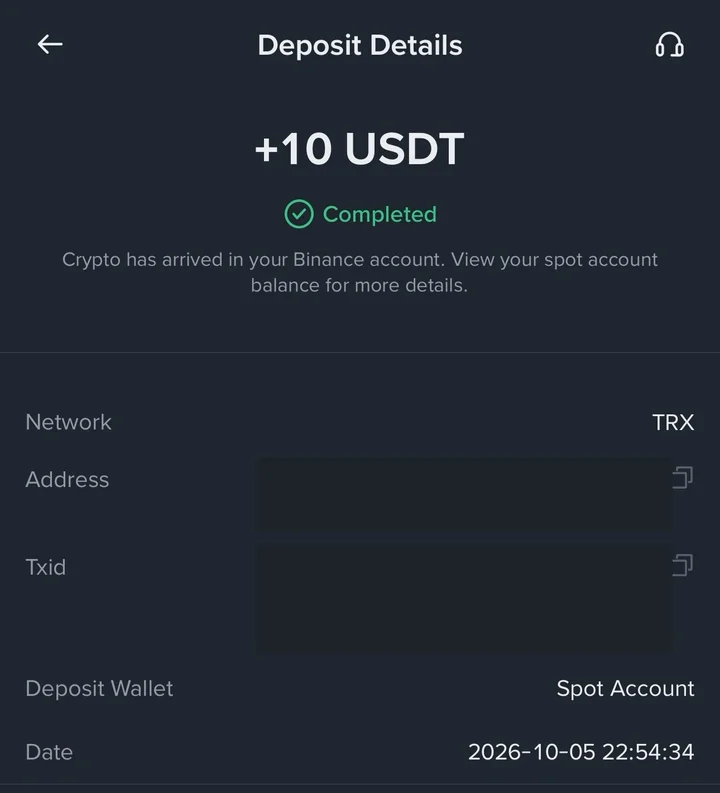
Wait for the deposit. On Binance, tap Assets, then the history icon at the top right, and open your deposit records. When it shows Completed, the USDT is in your account.
My deposit went into my Spot Account, as the Deposit Wallet line shows, so it was ready to trade straight away. That is different from P2P, where the USDT arrives in your Funding Account.
P2P or an Indian exchange?
| Binance P2P | Indian exchange → Binance | |
|---|---|---|
| Who you pay | A P2P seller, by UPI from your own account | Your Indian exchange, using its INR deposit options |
| Screens | Shown step by step in sections 2 to 5 | Your exchange's own screens, plus the Binance deposit screens above |
| Where the USDT lands | Funding Account | Spot Account (on my deposit) |
| What to watch | Scams and the own-name rule | Choosing the same network on both sides |
7. Binance P2P scams to avoid
Watch for these tricks. The INR Zone notice in STEP 2 of section 2 warns about the first one.
"Verify your Flash USDT." Anyone asking you to verify or unlock Flash USDT is running a scam. It has nothing to do with your P2P order.
Proof outside Binance. Only your Binance account shows whether the USDT arrived. Don't trust a screenshot or message that says it was sent. Keep your own UPI payment record in case you need it for an appeal.
Payment outside the order. A seller who asks you to move to WhatsApp or Telegram, pay an account in someone else's name, or send more money "to unlock" the order is breaking the rules. Stay in the Binance order chat.
Paying from someone else's account. It breaks the P2P policy in section 1, and in a dispute you can be left to bear the loss.
If anything feels wrong, don't tap Transferred, Notify Seller. Talk to Binance support from the order instead.
8. Binance P2P FAQ
Can I buy without KYC?
No. Binance's P2P guide lists identity verification and 2FA as requirements, and without KYC the order stops at Verification Required, even on the Verification-free tab.
Where is my USDT after the order?
In your Funding Account. Move it to your Spot Account with Transfer before you trade.
What is Lightning UPI?
It is a payment option some sellers offer, and Binance lists it under Recommended: Instant Release in the filter. On my screen its rate was higher than regular UPI (109.00 vs 103.99 INR), so compare before you choose.
That's how to buy USDT on Binance with INR. Next, put it to use with your first spot trade.
Well done!