Hi, this is CoinFirstStep. This beginner's guide to Binance futures trading walks you through your first futures trade in the Binance app: opening a position, protecting it and closing it, one screen at a time.
The short answer: on the Futures screen, set Cross or Isolated and the leverage, enter a price and amount, then tap Buy/Long (if you expect the price to rise) or Sell/Short (if you expect it to fall). Add TP/SL to set your exit prices, and tap Close on the position card when you're done.
20% commission rebate
Referral link: you get a 20% commission rebate on your trading fees (disclosure).
At a glance
| What you need | A verified Binance account, USDT in your USDⓈ-M Futures wallet, and the Futures quiz passed |
|---|---|
| Where | Binance app: Futures at the bottom → USDⓈ-M |
| Before you order | Margin mode (Cross / Isolated) and leverage, at the top left of the order panel |
1. Before you start: what a futures trade is
On the spot market you buy the coin itself. Binance futures trading works differently: with USDⓈ-M Futures you trade a contract on the coin's price, paid in USDT, so you can profit when the price rises (Long) or when it falls (Short). The contracts in this guide are Perp (perpetual) contracts, with no expiry date.
Three words show up on every futures screen:
Leverage multiplies your position.
Margin is the USDT you put up for the position. On the order screen it appears as Cost.
Liq. Price (liquidation price) is the price at which Binance closes your position automatically. Binance shows it before you order and on your position card.
You need USDT in your USDⓈ-M Futures wallet first. If it's still in Spot, follow how to transfer USDT from Spot to Futures. That guide also covers the one-time Futures quiz. If you have never traded at all, your first spot trade is a gentler place to start, because the order screen works in a similar way.
Futures also need a verified account. If yours isn't verified yet, verify your identity (KYC) first.
Futures trading uses leverage, so losses can grow quickly, and Binance can close a position automatically (liquidation) when the price moves against you. You can lose the money you move into Futures. This is a how-to guide, not investment advice.
For your first futures trade, use a small amount you can afford to lose.
2. Set the margin mode and leverage
Set these two before you place an order. Binance doesn't let you change the margin mode while you have any open orders or positions.
Tap Futures at the bottom, check that USDⓈ-M is selected at the top, and pick a contract (such as BTCUSDT Perp). Then tap the margin mode button, which says Cross here.
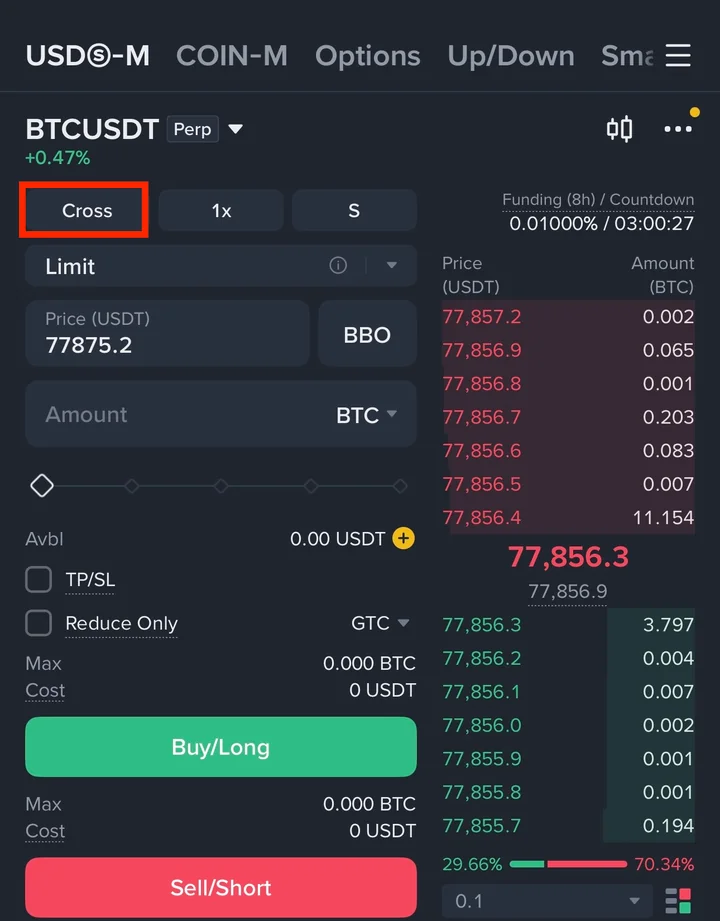
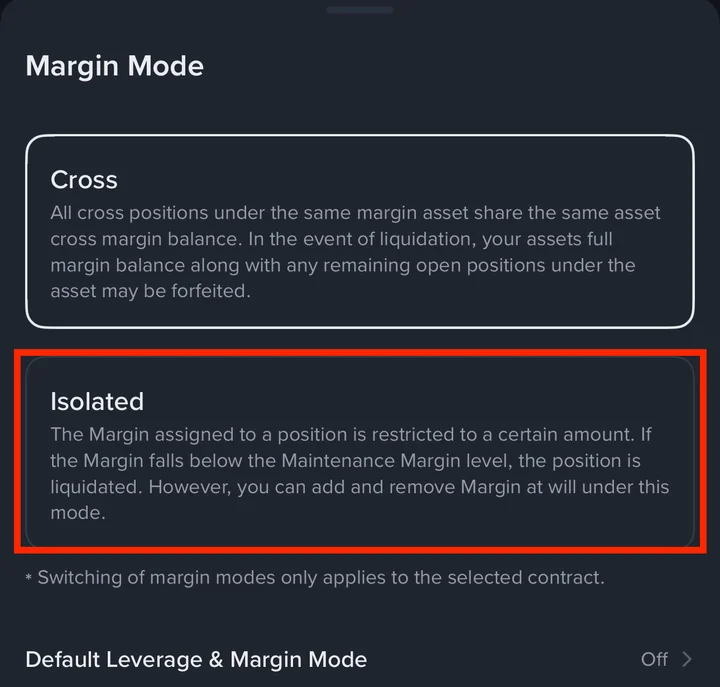
The Margin Mode window opens. Choose one:
Cross shares your margin across your positions. Your whole Futures wallet balance can be used to keep a position open, and if it's liquidated, that balance can be lost.
Isolated limits each position to the margin you put into it. If that position is liquidated, you lose that margin, not the rest of your wallet.
The note at the bottom says the switch applies only to the contract you selected. Binance sets every contract to Cross by default (How to switch between Cross and Isolated).
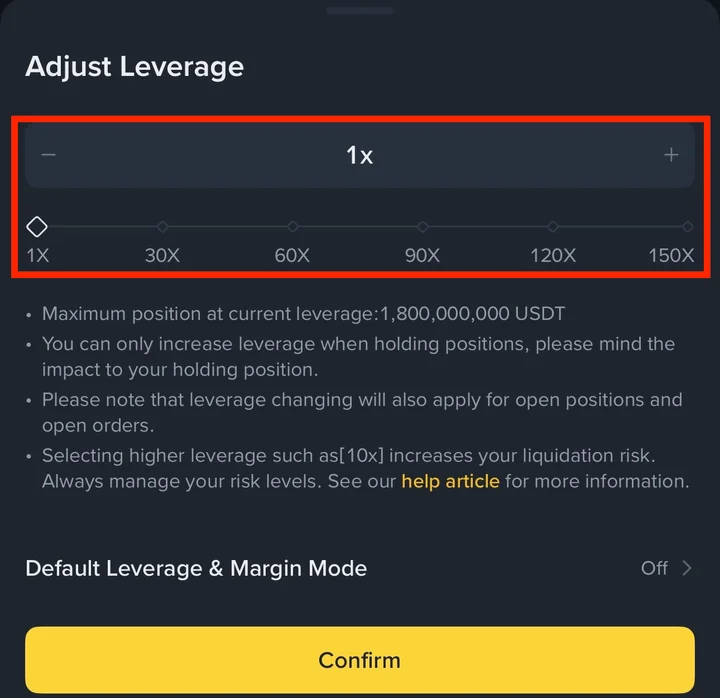
Tap the leverage button next to the mode. In Adjust Leverage, drag the slider or tap − and +, then tap Confirm.
For BTCUSDT the slider went up to 150x. A note in the window says higher leverage increases your liquidation risk.
▣ Setting a default for every contract
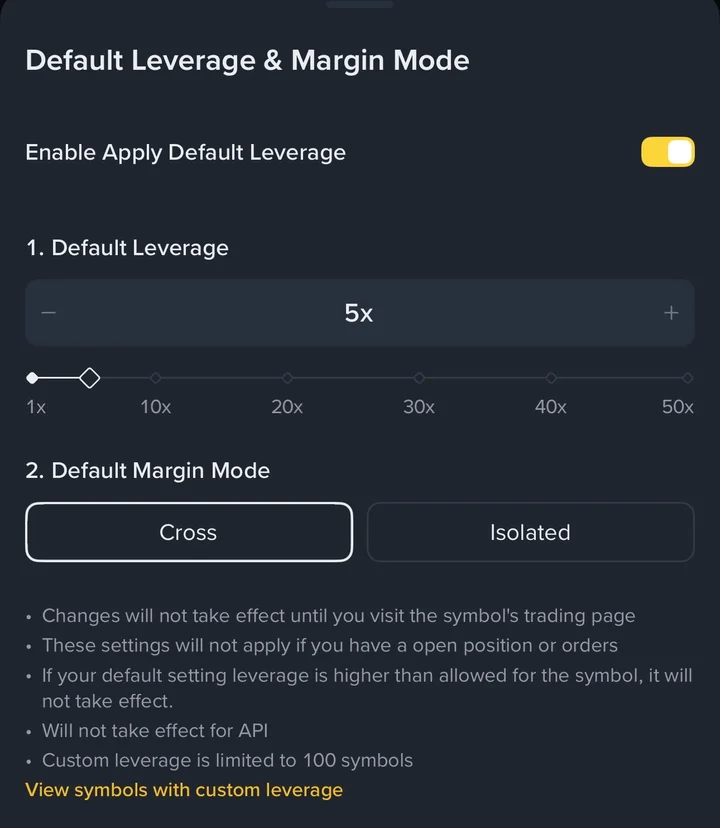
Below the slider, Default Leverage & Margin Mode lets you turn on one leverage and one mode for every contract.
As the notes on the screen say, it takes effect when you open the contract's trading page, and it doesn't apply while you have an open position or order.
3. Place your order: Buy/Long or Sell/Short
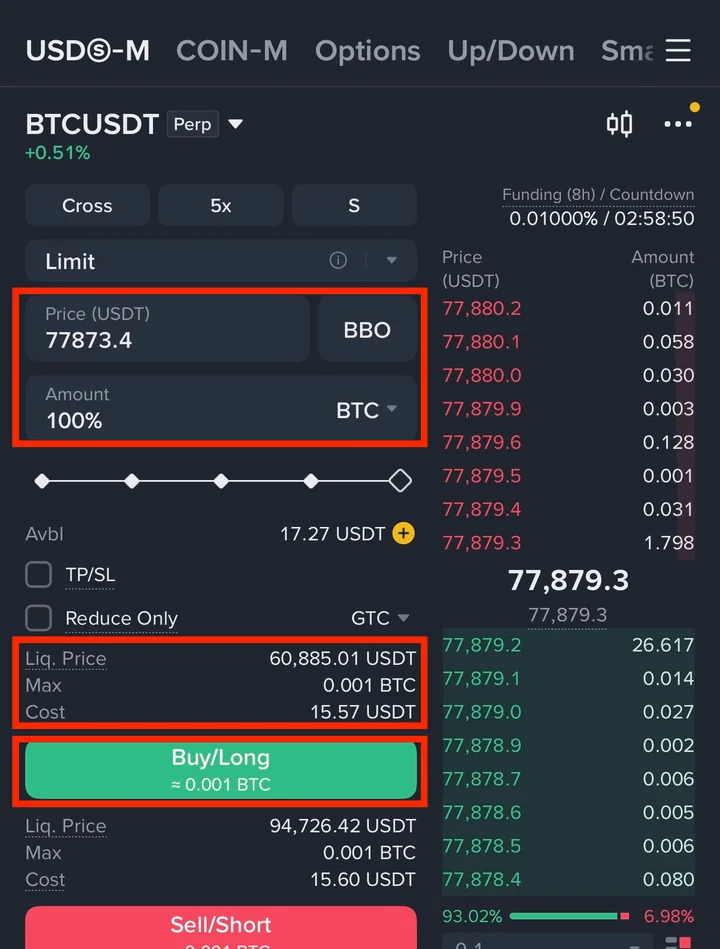
Leave the order type on Limit to choose your own price, or switch it to Market to trade at the current price. Enter the Price, then the Amount (or drag the slider).
Before you tap, read the lines above each button. Binance shows the Liq. Price, Max and Cost separately for a long and a short.
Tap Buy/Long if you expect the price to rise, or Sell/Short if you expect it to fall.
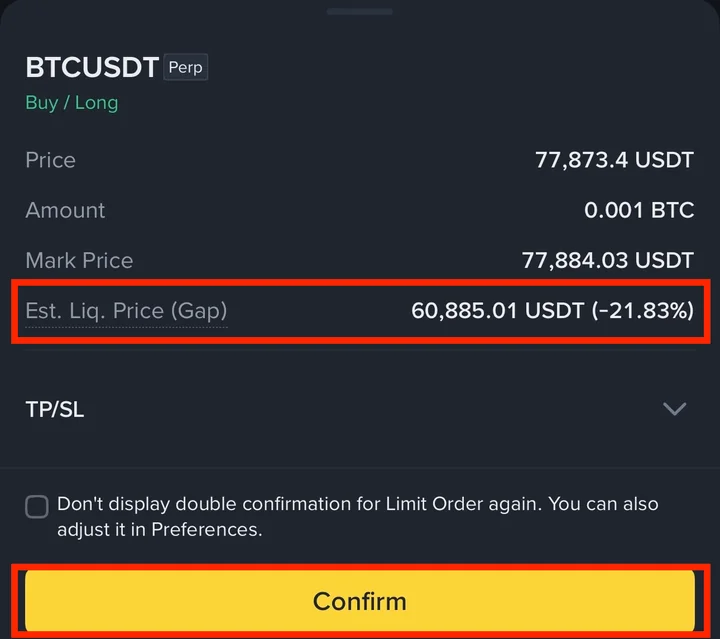
A confirmation window repeats your order. Check the Est. Liq. Price (Gap) line: mine showed a gap of −21.83%, so the price had to fall about 21.83% from the mark price before my 5x long was liquidated. Tap Confirm. (The TP/SL line in this window is covered in section 4, Add a take profit and stop loss.)
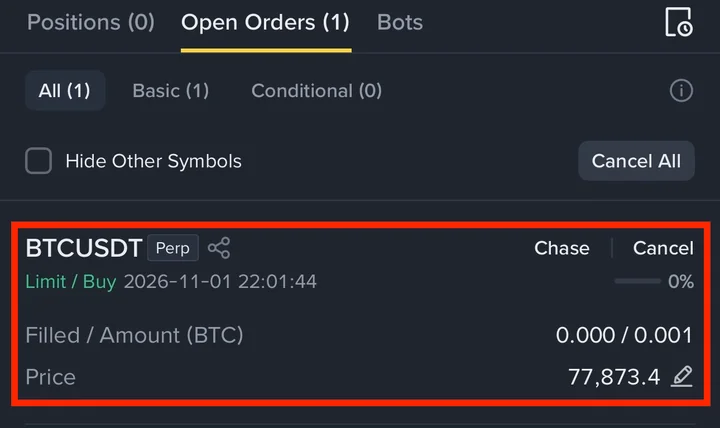
A limit order waits under Open Orders until the price reaches it. Mine shows Limit / Buy and 0.000 / 0.001 filled. Tap Cancel to remove it.
My price was below the market price, so the order sat here unfilled. The position in the next step opened later.
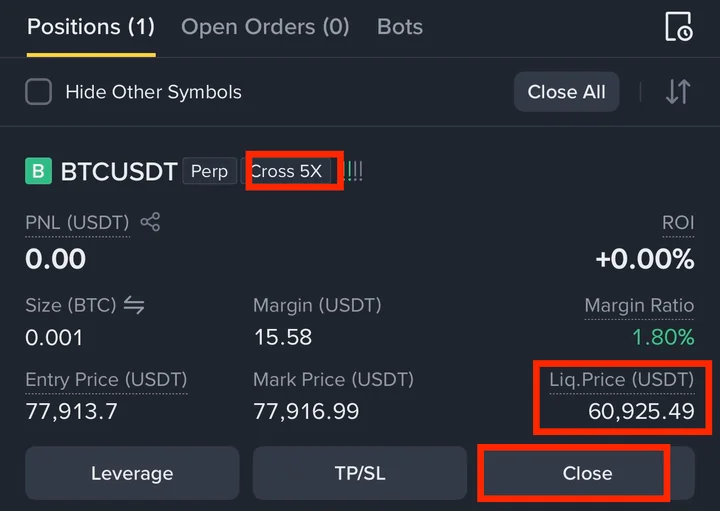
Once the order fills, it moves to Positions. On my card:
Cross 5X next to the symbol: the mode and leverage.
PNL and ROI: your profit or loss right now.
Size, Margin and Entry Price: how big the position is, the money backing it and the price you got in at.
Mark Price: the price Binance uses for liquidation and unrealized profit.
Liq.Price: the price at which the position would be liquidated.
Entry Price and Mark Price look alike but do different jobs:
| Entry Price | Mark Price | |
|---|---|---|
| What it is | The average price your order filled at | Binance's fair price, based on prices across major exchanges |
| Does it move? | No, unless you add to the position | Yes, all the time |
| Used for | The starting point of your profit or loss | Your unrealized PNL and liquidation |
Your unrealized PNL is the gap between the two. Because liquidation follows the mark price, not the last trade, a brief spike on Binance alone is less likely to liquidate you.
The three buttons at the bottom are Leverage, TP/SL and Close.
4. Add a take profit and stop loss (TP/SL)
A take profit closes your position when the price reaches your profit target. A stop loss closes it when the price moves against you by as much as you're willing to lose. Setting both means you don't have to watch the screen to get out.
You can set them while you order (4-1 in section 4) or on a position that's already open (4-2 in section 4).
4-1. Set TP/SL when you order
On the order panel, tick TP/SL and enter a Take Profit price and a Stop Loss price. Then tap Buy/Long or Sell/Short.
Last next to each one means the trigger watches the last traded price.
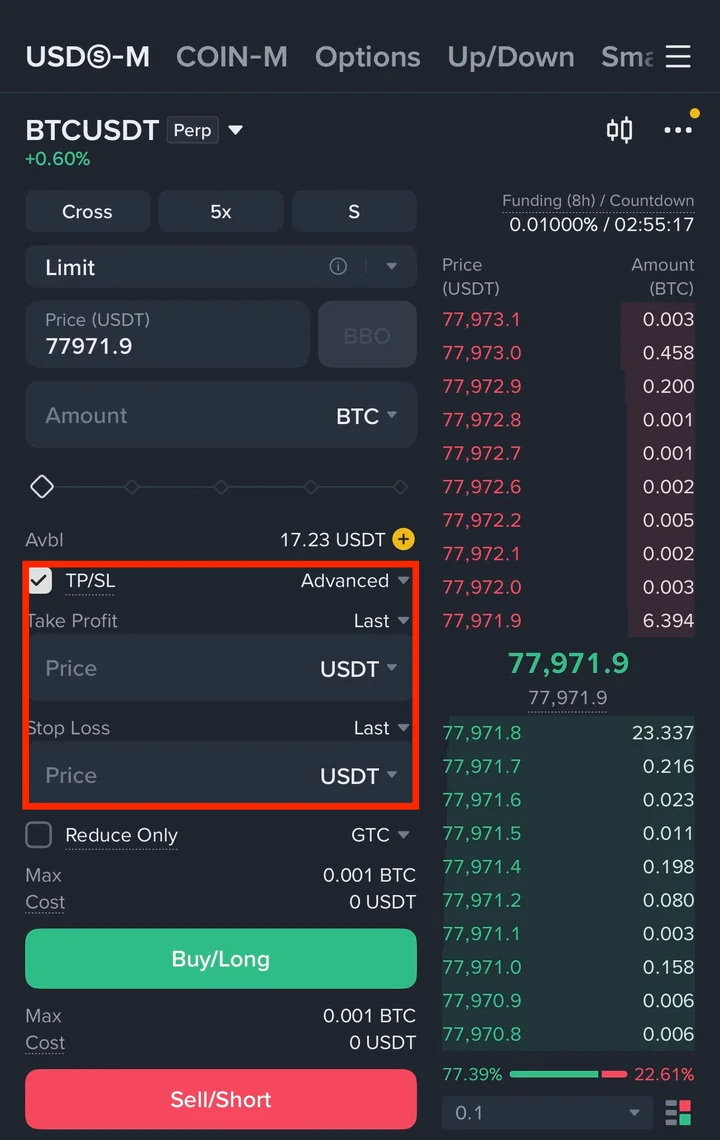
You can also set them in the confirmation window (section 3 STEP 2). Tap TP/SL to open it, tick Take Profit and Stop Loss, and enter a Trigger Price for each (or a PnL amount in USDT). Then tap Confirm.
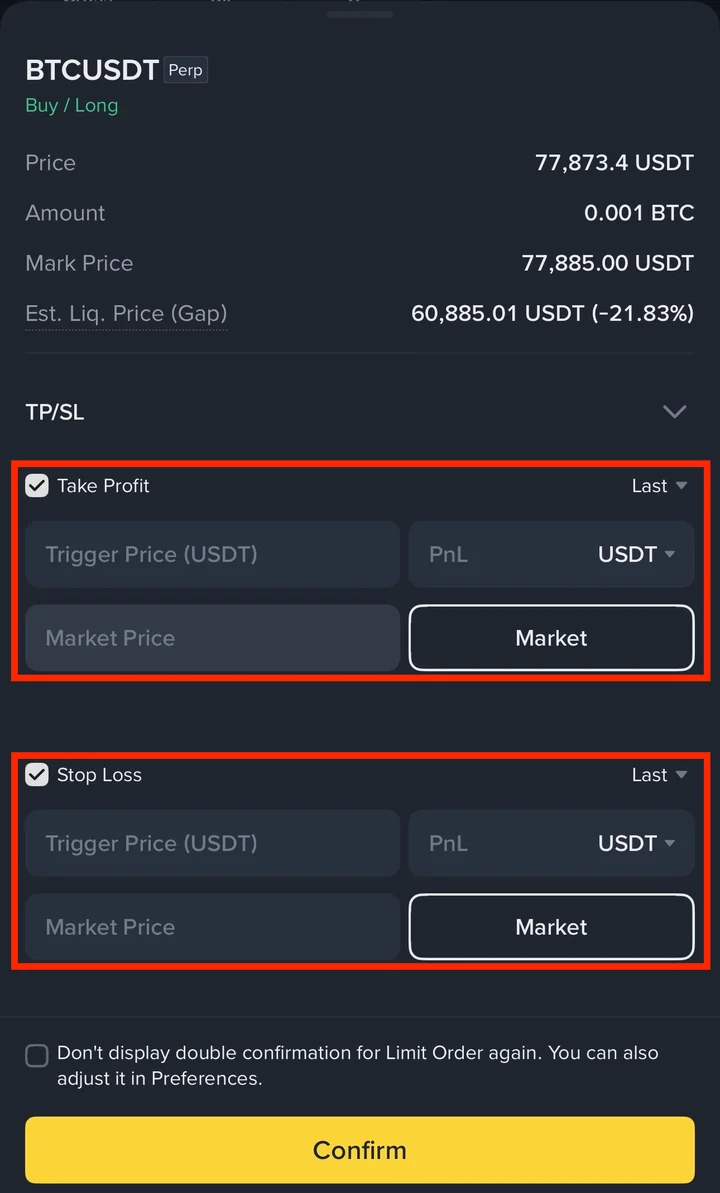
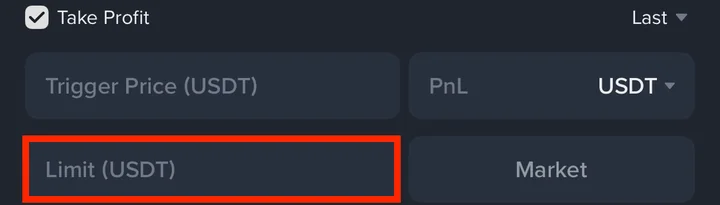
Each exit runs as a Market order by default. Tap Market next to it to enter a Limit price instead.
4-2. Add TP/SL to an open position
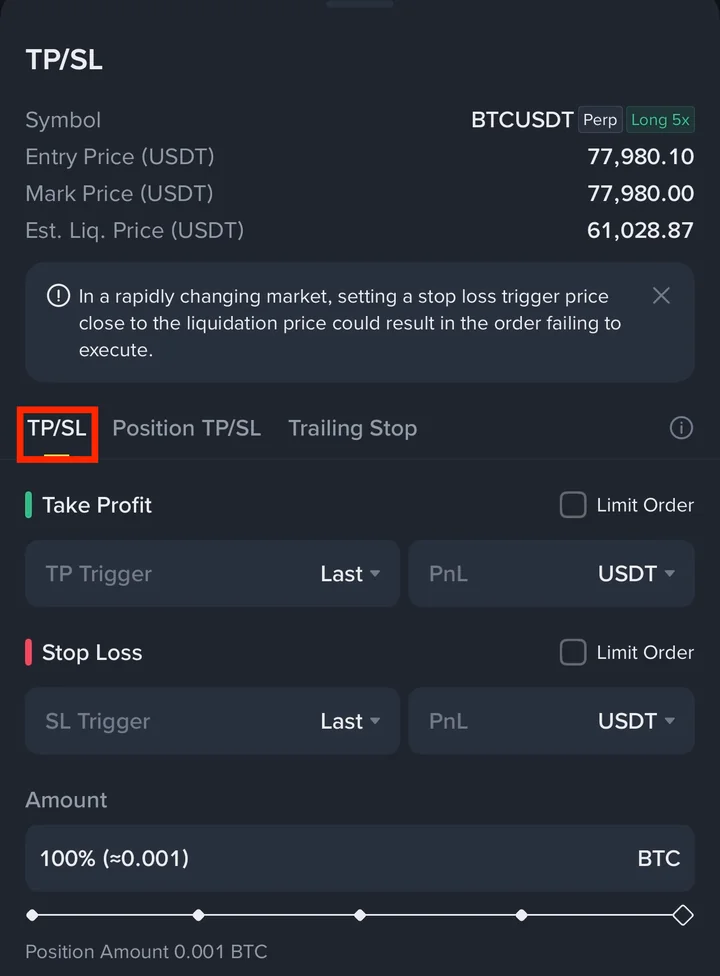
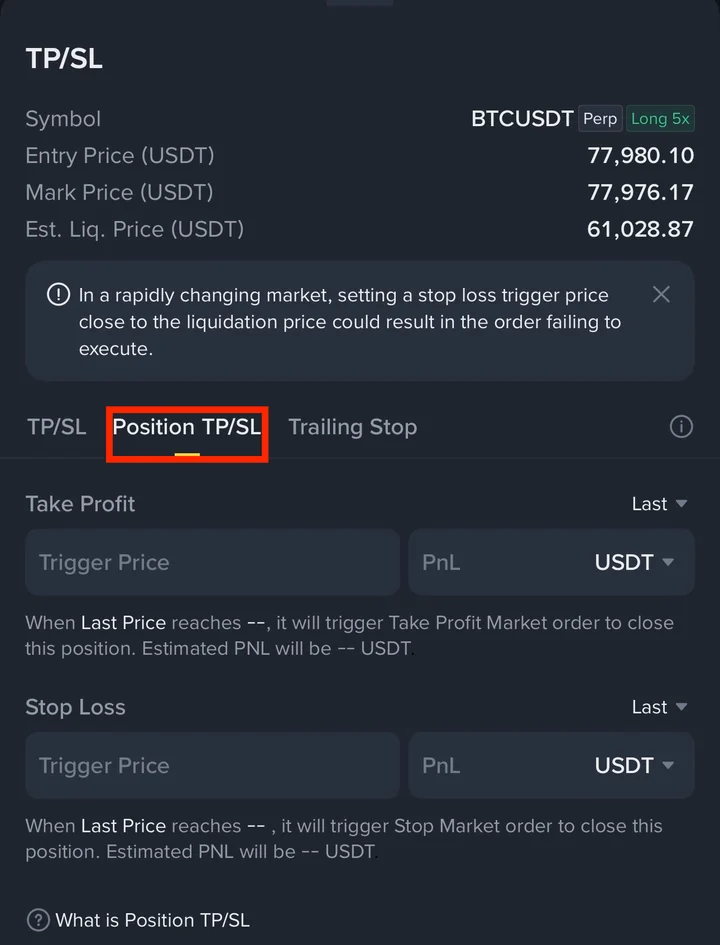
Tap TP/SL on the position card (section 3 STEP 4). The TP/SL window has three tabs.
A note at the top of the window warns that in a fast market, a stop loss set close to the liquidation price might fail to execute. Leave some room between the two.
TP/SL tab: enter a TP Trigger and an SL Trigger (or a PnL amount). Tick Limit Order if you want a limit price instead of a market close. Under Amount you choose how much of the position it covers, so you can take profit on part of it.
Position TP/SL tab: there is no Amount here, and no Limit Order box. Enter a Trigger Price (or a PnL amount) for Take Profit and Stop Loss. The line under each field then spells out what will happen:
Under Take Profit: when the last price reaches your trigger price, a Take Profit Market order closes this position, and the line shows your estimated PNL in USDT.
Under Stop Loss: when the last price reaches your trigger price, a Stop Market order closes this position, again with the estimated PNL.
Until you enter a price, the line shows dashes (--) in place of the price and PNL.
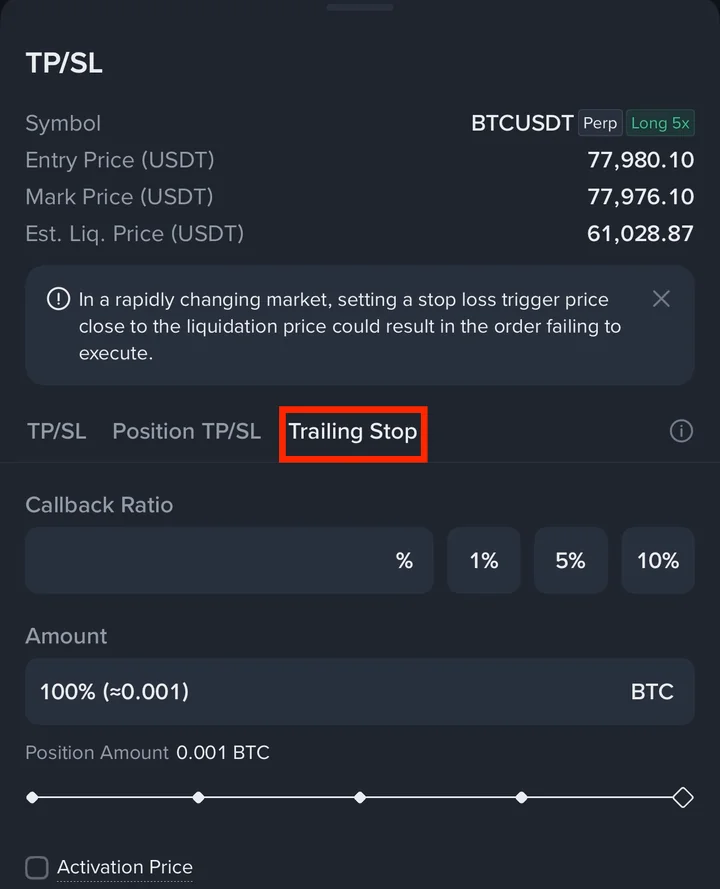
Trailing Stop tab: a trailing stop follows the price while it moves your way and closes the position when it turns back by the Callback Ratio you set (type a % or tap 1%, 5% or 10%). Tick Activation Price to start trailing only from a price you choose. Tap Confirm on whichever tab you used.
The three tabs side by side
| Tab | How much it closes | How it closes |
|---|---|---|
| TP/SL | Only the amount you set with Amount, part or all | At market, or at your limit price if you tick Limit Order |
| Position TP/SL | The whole position | At market only |
| Trailing Stop | Only the amount you set with Amount | At market, once the price turns back by your Callback Ratio |
TP/SL and Position TP/SL are the two people mix up. TP/SL works on a fixed amount: if it covers 0.001 BTC and you add to the position later, the extra part has no take profit or stop loss. Position TP/SL is tied to the position itself and closes all of it, so it's the simpler choice when you want one exit for everything. Use TP/SL when you want to take profit on only part of a position or close at a limit price.
4-3. Check your TP/SL orders
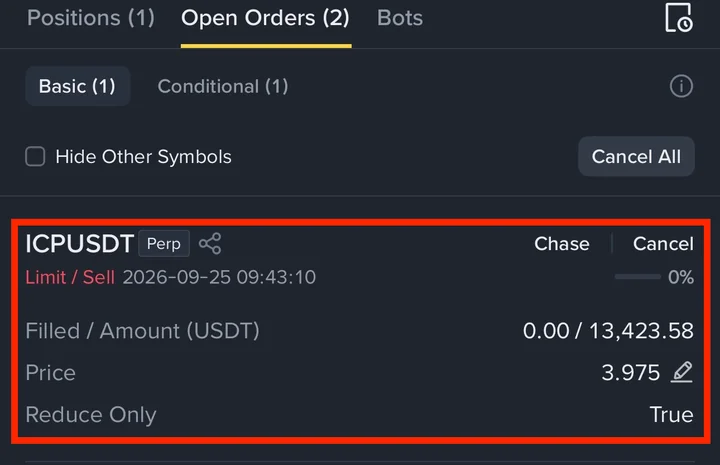
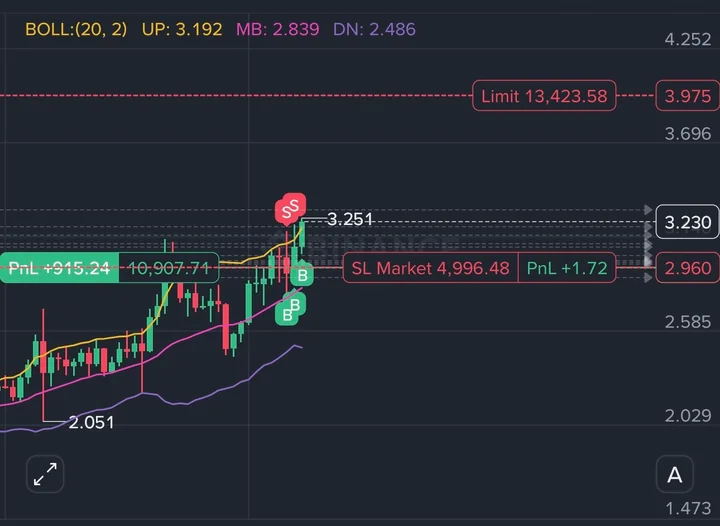
Once set, your take profit and stop loss wait under Open Orders. Here is how they looked on one of my real positions, ICPUSDT.
Under Open Orders → Basic, my take profit was a Limit / Sell at 3.975 with Reduce Only: True.
Reduce Only is a safety switch on an order: the order may only make your position smaller or close it. It can never add to the position or open a new one in the opposite direction.
True means the switch is on for this order. False would mean an ordinary order, which can also open or grow a position. Take profit and stop loss orders you set with TP/SL are reduce-only, so they show True.
Why it matters: a take profit on a long is a Sell order. Without Reduce Only, if your position were already gone (say your stop loss closed it first), that sell could fill and open a short you never meant to have. With Reduce Only, it can only close what you hold, so the worst case is that it doesn't fill at all.
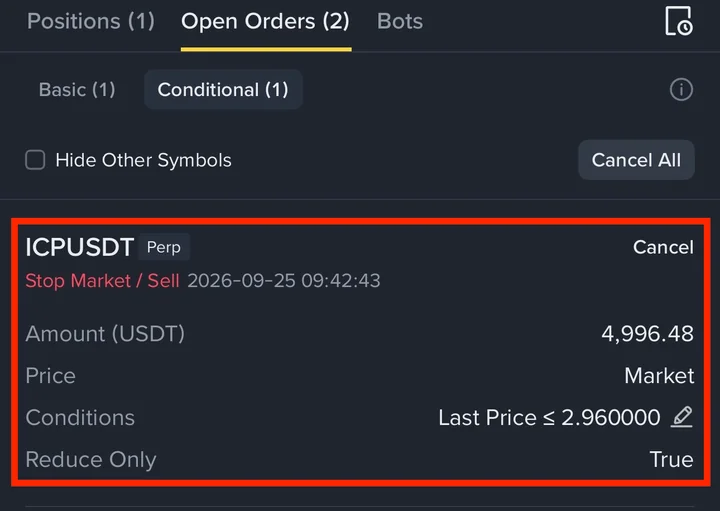
Under Conditional, my stop loss was a Stop Market / Sell with the condition Last Price ≤ 2.960000. That was right at my entry price of 2.958975, so if the price fell back, I would get out near where I got in.
The chart shows both as lines: Limit above the current price and SL Market below it. The green PnL label marks my position.
▣ If you close the position yourself
Take profit and stop loss orders set with TP/SL are normally cancelled when the position closes. Still, check Open Orders afterwards: if an order for that contract is still waiting, such as one you placed separately, cancel it.
5. Close your position
On the position card, tap Close (see section 3 STEP 4). The Close Position window shows your entry price, the mark price and the Estimated PNL. The amount is set to 100% of the position. Drag the slider to close only part of it.
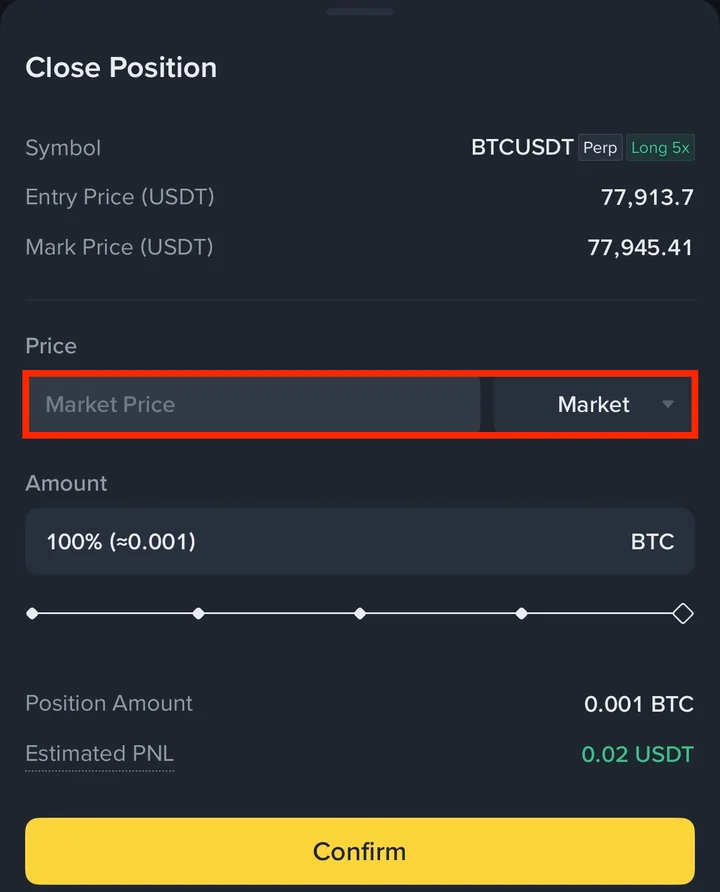
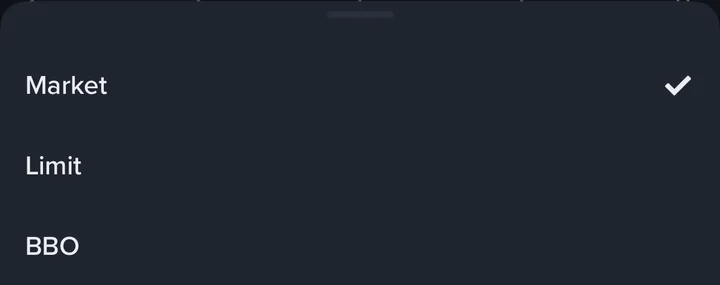
Tap the price type to choose how to close:
Market closes right away at the current price.
Limit lets you type the price you want, and it waits until the price gets there.
BBO (Best Bid and Offer) is a limit order that fills in the price for you from the order book, so you don't have to type it.
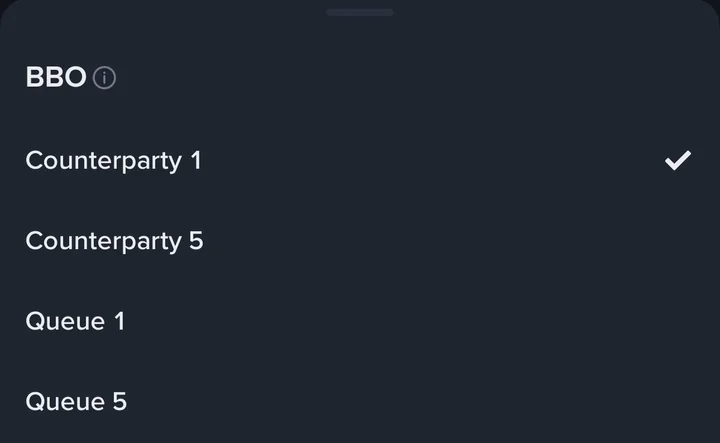
The order book has two sides: buyers waiting to buy (bids) and sellers waiting to sell (asks). Closing a long is a sell, so the buyers are the other side (the counterparty) and the sellers are your own side (the queue).
With BBO, you pick which price to use:
Counterparty 1: the best buyer's price. Your sell meets a buyer who is already waiting, so it usually fills right away, much like Market, but at a set price.
Queue 1: the best seller's price. Your sell joins the front of the sellers' line and waits for a buyer to come to you.
Counterparty 5 and Queue 5 use the fifth-best price on each side instead.
For example, if the best buyer is at 77,900 and the best seller is at 77,910, Counterparty 1 sells at 77,900 and Queue 1 sells at 77,910. Because a BBO order is a limit order, the price stays where it was set. If the market moves away, the order waits until it comes back or you cancel it (Understanding BBO orders).
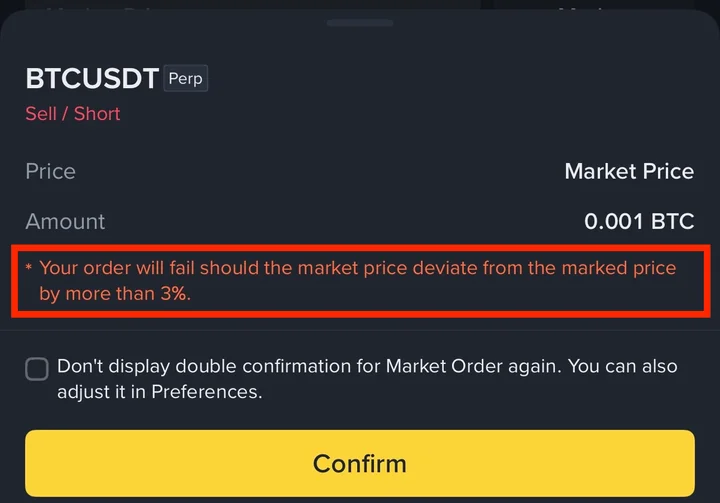
I closed with Market. Closing a long is a sell, so the confirmation says Sell / Short. That's normal. It doesn't open a short. A note warns that a market order fails if the market price is more than 3% away from the mark price. Tap Confirm.
The position disappears from Positions and appears in My Trades → Position History, marked Closed. There you can check the average entry and close prices, the result, and when the position opened and closed.
6. Binance futures trading for beginners: FAQ
What is the "Funding (8h)" number at the top right?
Perpetual contracts have a funding payment that long and short holders pay each other, usually every 8 hours. Binance doesn't take it as a fee (Introduction to funding rates). You only pay or receive it if you hold a position at the funding time.
Which leverage should I use?
That's your decision, but you can see its effect before you order. Each time you change the leverage, check how the Liq. Price and the Est. Liq. Price (Gap) change. The higher the leverage, the smaller the price move it takes to reach liquidation.
Do I have to set TP/SL when I order?
Not always. You can add it later with the TP/SL button on the position card (see 4-2 in section 4, Add TP/SL to an open position), or close by hand with Close. But I strongly recommend setting at least a stop loss. With leverage, a drop costs you several times more than the same drop on spot, so the loss can grow fast. I set a stop loss on every futures position.
What's the difference between Close and Close All?
Close on a card closes that one position. Close All at the top of the Positions tab closes all of them.
That's it: you've made your first futures trade. When you're done with futures for now, move the USDT you don't need back to Spot (how to move it back).
Well done!